

Introduction
Kubernetes is an open-source container orchestration platform that automates the deployment, scaling, and management of containerized applications. It provides a robust infrastructure for running containerized workloads, including support for load balancing, auto-scaling, self-healing, and more. In this blog, we will explore Kubernetes concepts and set up a Kubernetes cluster using Minikube.
Prerequisites
Before you begin, make sure you have the following tools installed on your machine (check out installation instructions for your operating system) :
Getting Started
Setting up Minikube Minikube is a lightweight Kubernetes implementation that can run on your local machine. To get started with Minikube, follow these steps:
Install Minikube: Download and install Minikube from the official website.
Start Minikube: Open a terminal and enter the following command to start the Minikube cluster:
minikube start
This command will start a single-node Kubernetes cluster using the Minikube VM.
Verify Minikube: To verify that Minikube is running, enter the following command.
kubectl get nodes
This command will list the nodes in your cluster. You should see a single node with the status "Ready".
Kubernetes Concepts
Now that we have a Kubernetes cluster up and running, let's explore some of the key concepts of Kubernetes.
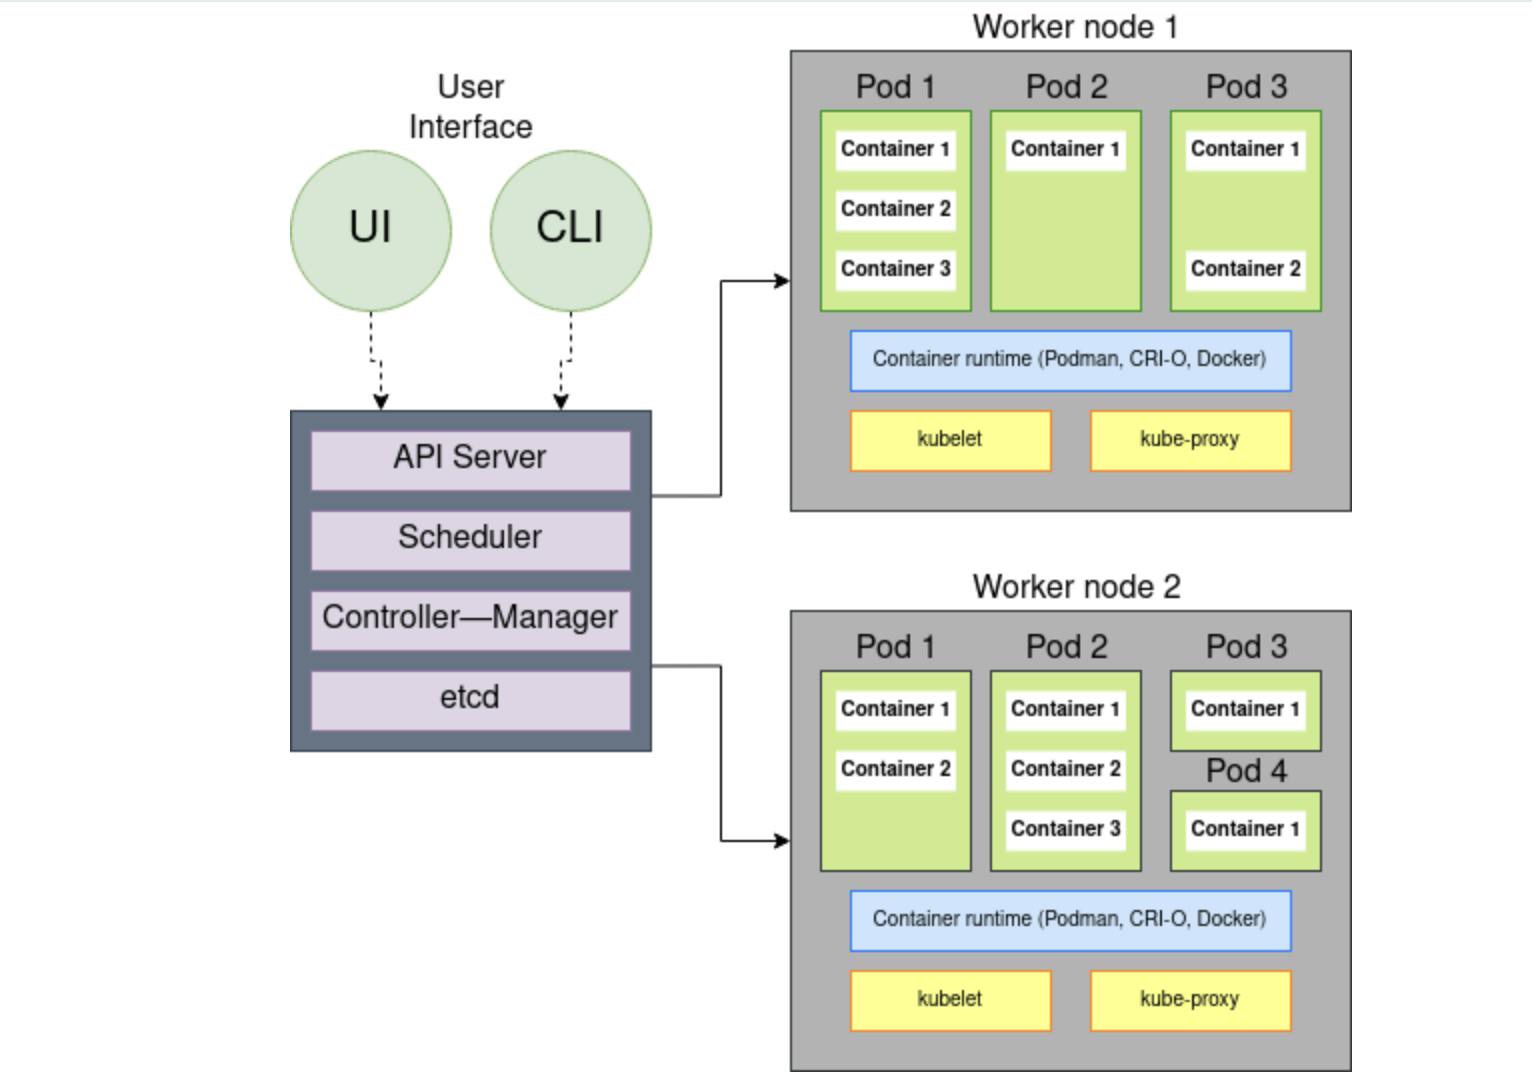
- Nodes: Nodes are the individual servers or virtual machines that make up the Kubernetes cluster. Each node has a unique hostname and IP address.
You can view the nodes in your cluster by running the following command:
kubectl get nodes
- Pods: Pods are the smallest deployable units in Kubernetes. They represent a single instance of a running process in the cluster. A pod can contain one or more containers, which share the same network namespace and can communicate with each other using
localhost.
This is an example pod YAML file:
apiVersion: v1
kind: Pod
metadata:
  name: sample-pod
spec:
  containers:
  - name: sample-container
    image: nginx
This YAML file will create a pod with a single container running the Nginx image.
To create a pod using the YAML file, run the following command:
kubectl apply -f <filename>.yaml
- Services: Services provide a stable IP address and DNS name for a set of pods in the cluster. They allow clients to access the pods without knowing their individual IP addresses. Services can be exposed internally within the cluster, or externally to the internet.
Here's what a service YAML file will look like:
apiVersion: v1
kind: Service
metadata:
  name: sample-service
spec:
  selector:
    app: sample-app
  ports:
  - name: http
    port: 80
    targetPort: 8080
  type: LoadBalancer
This YAML file will create a service that routes traffic to pods with the label app=sample-app on port 80. It also exposes the service externally using a load balancer.
To create a service using the YAML file, run the following command:
kubectl apply -f <filename>.yaml
Deployments: Deployments are a higher-level abstraction over pods and services. They provide a way to manage the desired state of your application, including the number of replicas and the container image used. Deployments also support rolling updates and rollbacks.
  apiVersion: apps/v1
  kind: Deployment
  metadata:
    name: sample-deployment
  spec:
    replicas: 3
    selector:
      matchLabels:
        app: sample-app
    template:
      metadata:
        labels:
          app: sample-app
      spec:
        containers:
        - name: sample-container
          image: nginx:latest
          ports:
          - containerPort: 80
This YAML file will create a deployment with three replicas of a pod running the Nginx image. It also specifies the label
app=sample-appfor the pods.To create a deployment using the YAML file, run the following command:
kubectl apply -f <filename>.yamlThis will create the deployment and start the specified number of replicas. You can view the status of the deployment using the following command:
kubectl get deploymentsThis will show you the number of available and desired replicas, as well as the current status of the deployment.
Scaling Deployments: One of the key benefits of using Kubernetes is the ability to scale your application up or down as needed. You can scale deployment using the
kubectl scalecommand, like this:kubectl scale deployment <deployment-name> --replicas=<new-replica-count>For example, to scale our
sample-deploymentto five replicas, you would run the following command:kubectl scale deployment sample-deployment --replicas=5This will add two new replicas to the deployment, bringing the total number of replicas to five.
Updating Deployments: Another key feature of Kubernetes is the ability to update your application without downtime. You can update deployment by editing the YAML file and then applying the changes using
kubectl apply.
Here's an example of how to update the sample-deployment to use a different container image:
- Edit the deployment YAML file and change the image name:
apiVersion: apps/v1
kind: Deployment
metadata:
  name: sample-deployment
spec:
  replicas: 3
  selector:
    matchLabels:
      app: sample-app
  template:
    metadata:
      labels:
        app: sample-app
    spec:
      containers:
      - name: sample-container
        image: nginx:1.21.0
        ports:
        - containerPort: 80
- Apply the changes using
kubectl apply:
kubectl apply -f <filename>.yaml
This will update the deployment with the new container image, without any downtime for your application.
Conclusion
In this blog, we explored how to deploy and manage applications using Kubernetes. We learned how to create deployments with replicas, scale deployments, and update deployments with new container images. With these tools, you can deploy and manage your applications with ease, and take advantage of the many features and benefits of Kubernetes.
You can also learn more about Kubernetes architecture from "A guide to architecture blog"